Monday, January 30, 2012

Weekend in Pictures

What a gorgeous and busy weekend we had here. I found this lovely butterfly silk scarf at an estate sale and it makes me yearn for spring.

My hubby and I decided to take a last minute date night before our new little boy arrives...hopefully this week. We took in some shopping and a movie. Did you see The Grey this weekend? Scared the heck out of me, and hubby laughed at all my jumps and screeches. Now I know this movie wouldn't scare about 97% of the population, but I can scare myself in a lighted room with nothing in it :-) Overall, I didn't think the movie was really good, but better than some I have seen recently.
Hubby took me to the thrift store this weekend and I scored these two Missoni for Target Neoprene Laptop sleeves (1 for me and 1 for a friend) for just $6. Remember how crazy people were to snag a few Missoni goodies? Absolutely crazy that now I see them in a thrift store.
I have been searching for a pair of Foo Dog for like ever. I found this lovely pair at Target for just $9.99 each. They are ceramic and are a really pretty pewter color. I snatched these guys up and now are serving as bookends on my credenza.
Raspberry vanilla smoothies were the perfect pre-shopping treat. I hope everyone had a wonderful weekend.

♥ Jen

Friday, January 27, 2012

DIY- Simple Knot Glamour Earring

Here is another very simple DIY jewelry project. I gathered some leftover chains from other projects to create this simple, yet glamorous knot earring. Wanna see how I made these? Keep reading to see how I created it.
Materials:

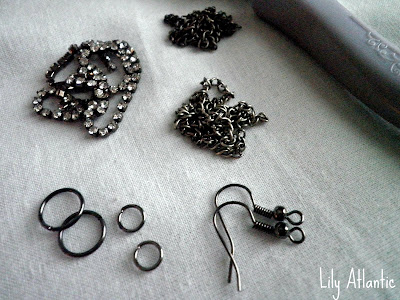
3- different types of chain or rhinestones- mine measured about 10 inches
2- Jump Rings
2- Earring Wires
Pliers

You can make your chains whatever length you would like or however far down you would like your earring to hang. Mine were not exactly the same length...I wanted more of an uneven bottom edge of the earring.
First, you will loop all three chains through a jump ring.
Second, tie a simple knot. You can make this as high or as low as you want...just make sure to move it into position before tightening the knot all the way. I am not going to lie, this was a little tricky...I actually had hubby help. Have no fear, once you figure out how to loop all the little chains at once, it goes quite easily.
Finish by adding a earring wire.
Voila! All finished. Super simple, super quick and a good way to use up some extra chain.
Hope you all have a wonderful weekend!

♥ Jen

Wednesday, January 25, 2012

Travel Comfort

Mulberry Diary, Kate Spade iphone case, Drape Sweater, H&M skinny jeans, H&M Sunglasses, Hurley Book Tote, Chanel Nail Color, Smashbox Eyelights Palette, Tory Burch Reva Flats.

Lately, we have been doing a lot of last minute travel. Sometimes these outings can be short or long trips, but either way I love to be comfortable in the car. Comfortable shoes and clothing are a must for me. Traveling always seems to get my mind in motion and I have come up with some killer ideas while out. So I don't forget things, I love to carry some sort of journal or diary to capture my thoughts and ideas. And, who couldn't forget a big satchel to put everything in!

♥ Jen

Monday, January 23, 2012

Weekend in Pictures

One of my favorite things to do is going to estate sales....it's such a treasure hunt and you just never know what you will find. This weekend my hubby took me to another estate sale and this one didn't disappoint. I snagged these wonderful vintage 50's opera glasses (with original case and box) for less than $5. They are in perfect condition and I can only imagine what they have seen.
We finally got snow over the weekend, so I took some time to create some more glamorous things for my Etsy store. You can find this one here.
Diva Darling and I had a girls night, complete with movies and junk food. Can you guess which movie was her choice?
Finally, these are some of my go to lip colors for this season. The lipstick is Loreal Color Riche in Scarlet and Smashbox lip gloss in Siren.

I hope you all had a wonderful weekend.

♥ Jen

Friday, January 20, 2012

DIY- Zipper Necklace

This week I actually planned to do a neon related DIY, but it didn't really come together like I wanted it to...so here is my alternative project. Now I don't claim to be the first one to come up with this idea, but I thought it was a good way to repurpose an old zipper that needed a new lease of life. I really liked how it turned out and it took less than 10 minutes to put together. Keep reading to see how I created it.
Materials and tools needed:

Zipper
5 Jump Rings
Clasp
Chain
2 Beads- I am using Jasper briolettes
Pliers
Slide a jump ring through each one of the beads.
Add jump ring to top of the zipper. This is where you will attach your lower beads and main portion of the necklace.
Make 2 different lengths of chain and attach beads, then attach to main portion of the zipper.
Next, attach main portion of your necklace to the zipper. Make the main portion of the necklace whatever length you want.
Finish necklace by adding the clasp.
This is the finished product! I am going to make several different ones of these using different types/colors of beads and metals.
Hope everyone has a great weekend.


♥ Jen


Not feeling crafting? You can find this in my etsy store here


Monday, January 16, 2012

Weekend in Pictures

Winter finally arrived this weekend, at least temperature wise...thank goodness we didn't receive any snow. This post is just about some of my favorite things from the weekend. I absolutely love dried cranberries. They are such a tasty treat that is low if fat and yummy to boot!
This is one of my new favorite scents. It is sugared vanilla from Yankee Candle. I get all the yummy smells without having to down a dozen cookies.
Trying to get a book read before my little one shows up...since I know it will be a few months before I will have time to read again. This is The Best of Me by Nicholas Sparks.
My little succulent is doing so well that I have decided to try and keep a larger plant alive. Diva Darling found this zebra striped pot at Ross last weekend and I think she did an excellent job picking it out. It looks perfect in our dining room.

After reading several blogs and perusing the Internet this week, I am going to try my hand at something neon for this weeks DIY (thank you Erin for the inspiration). Neon scares me a little, and definitely brings me back to my childhood in the 80's....who can forget neon friendship bracelets and socks?

Hope you all had a good weekend.

♥ Jen

Friday, January 13, 2012

DIY- Chevron Necklace

Lately, I have been totally obsessed with anything chevron or zig zag patterned. Over the past few months I have acquired anything from clothing to housewares in different chevron patterns and colors. I wanted to follow last weeks post with a repurposed DIY, so I created this necklace. For this project I used number 6 plastic, which is commonly used in take out boxes from restaurants, or in other terms...shrinky dinks! To see how I created it just keep reading!
Supplies needed:

Pliers
Chain
Clasp
Jump Rings
Chevron Clip Art or Pattern
Permanent Marker
No 6 Plastic- it will say somewhere on the container
150 Grit Sandpaper
Embossing Heat Tool
Paper Punch- not pictured
Scissors- not pictured

The pattern I made 6" in length (after shrinking it was 2"). You'll want to make it much larger than what you want your final project to be since it will shrink.

First, you'll need to prepare your plastic by roughing up the surface with 150 grit sandpaper.
Trace your pattern onto the plastic.
Cut pattern out.
Color both sides with a permanent marker.
Punch holes in each end using a paper punch. This will be where you attach your chain.
This is what it will look like after you have heated it up and made it shrink. Tip- when you are heating it up, it may curl. Don't worry it probably will work itself back out. If not stop heating and straighten back out, then heat back up. You'll want to straighten it out while it is still warm and pliable.
Attach jump ring and chain to each side of the chevron.
Add jump rings and clasp to the end and your done.
I have to say, I am pretty happy with the end result. This is a perfect DIY if you want to try out some different chevron patterns or any other patterns, and it is a perfect way to repurpose something that would otherwise go in the trash.

♥ Jen

Wednesday, January 11, 2012

Chevron Inspiration

I have always been inspired by patterns. and lately I have been loving anything with a chevron or zigzag pattern. When wearing it as fashion or in home design it really makes a strong impact. Adding chevron patterns to your wardrobe or home interior can be very simple and easily changeable....like adding a chevron bracelet or chevron throw pillow to your couch.

The chevron pattern has inspired my DIY for this week so check back on Friday to see what I create.

♥ Jen

Monday, January 9, 2012

Weekend in Pictures

I officially have 4 weeks left until my little boy comes, and I really haven't had the energy to go and do to many things over the weekend (even though sadly, it was over 60 degrees this weekend). So this weeks post is kind of just some of the things I have been working on, and some of the things that I love right now.
Hubby got this leather wallet/coin purse for me for Christmas. It is so buttery soft and has a gorgeous silk lining on the inside. I absolutely love it!
I have heard so much about Maybellines Baby Lips that I had to get a couple to try out. I haven't had them long enough to determine whether or not I love them, so we'll see how it goes.
Lemon Curd has been one of my favorites since I was a child. It is so yummy spread on a piece of toast.
I love this classic saying. It is one of those things that I try to remind myself of often. Have I mentioned that I have a 2 year old? I have an easy DIY for this week, so be on the lookout for that post at the end of the week. Anyways, I hope everyone had a good weekend.

♥ Jen